Citrus Fruit Oil Painting Tutorial

I just finished my third citrus fruit painting so I thought I'd make a blog post about my process.
The purple lemon was suggested by a friend on Instagram and I immediately fell in love with the idea! Since purple fruits are rare in nature, I decided it would be a fun experiment. The end result is a tad more artificial than I was going for but I still like it (This is probably because I was actually using magenta when I thought I was using alizarin crimson the whole time). Also, the thought of a purple lemon is totally absurd and it's a little reminder that as an artist, I can paint whatever I want. I can paint a lemon purple or invent my own fruit and most importantly, I get to choose how closely a painting matches reality.
First, a bit about the materials I used. I made this painting with Winsor and Newton water mixable artisan oil colors and the corresponding medium. I like this line of paints because the clean up is way easier than other oil paints (no mineral spirits or turpentine required, just water). For brushes, I'm not picky. I just use whatever I have on hand, but I do prefer flat brushes over round ones because I think they're easier to control.
Now on to the painting part...
The first thing I did was draw a rough sketch to outline the fruit sections and outer rind.
Next, I used a medium-sized brush to block in color in each section: first covering the entire section with a middle tone color (dioxane purple in this case) and then lightening the inner third with a bit of magenta and darkening the outer third by adding ultramarine blue (and a little alizarin crimson to keep it from getting too blue.
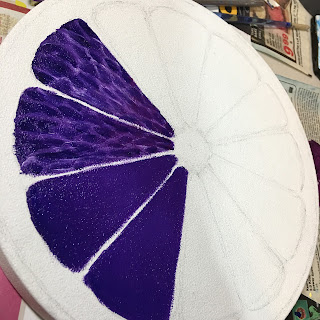 |
| Two sections with purple base layer |
 |
| membranes before blending |
 |
| membranes after blending |
Once the first layer was dry, I painted the rind and membranes between the sections using dioxane purple and black for the rind and white, magenta, and purple for the membrane. I also went over some of the tiny membranes with white to make them stand out.
 |
| rind and outer membranes painted, some tiny membranes emphasized |
After the entire painting dried, I started glazing. To do this, I mixed purple and magenta with a bit of medium to make it transparent and used it to cover the entire sections. I also glazed over the outer edges of each section with a mixture of purple, ultramarine blue, and black. Glazing seriously adds so much depth to the painting. I find it much easier to work in layers like this because, for me at least, colors get muddy when using a direct (or wet-into-wet) technique.
 |
| glazing- bottom half after first glaze, top half after darkening edges |
The last thing I did was add tiny white highlights to make the fruit look extra juicy and I also lightened parts of the outer membrane that were too purple before.

Tada! I used the same process for the lime and blood orange just with different colors (lemon yellow and pthalo blue for the lime, and cadmium yellow medium, cadmium red light, and alizarin crimson for the blood orange). Please comment below with any questions about my technique or oil painting in general and click the subscribe button to get notified about my next post!


Comments
Post a Comment